Image Map

Winner(s) of the Paper Crafts Cool Tools Blog Hop!


Hey there lovely crafting friends!! It's winner day! Thank you for the wonderfully sweet comments. It was my first Paper Crafts magazine blog hop, and I had a lot of fun. Because of all the sweet comments, I've decided to give out another 
prize in addition the free copy of this AMAZING special issue!

So there are TWO winnner.....the winners are:

Prize from my stash who said
Die Cut Lady said...
Thanks for the ideas on using up scraps I have a ton!


Sadielaine said...
Your card is so cool! I love the way you did the patchwork stars. I am going to give those a try. My favourite tool is my Big Shot. I put it to use every time I papercraft.


Email me at queenerh@yahoo.com your full name and mailing address so I can get your prize sent to you! Thanks for hopping along!

Avocado Arts + A Sneaky Peek of February's set

     Hey there everyone! I am having so much fun playing with Avocado Arts stamps! Today, I'm going to share with you a teeny weeny sneaky peak of next month's set, Wishes and Kind Thoughts. It's totally adorable! You're going to love it! 
I LOVE banners! I love the way they hang on a card. Practically every card I make has a banner or pretty twine and trims that hang. Banners make GREAT focal points. In fact my first published project had a banner, so they're very dear to me. However, I love texture too! So, I added trims like pom pom's and this adorable beaded trim to celebrate my love of both! I found the beaded trim at a scrapbook fair I attend twice a year. I buy it in hoardes--love it to pieces! 

So, for my sneaky peak the stamped banner comes from a small section of a larger stamp in the set. All you need to do is stamp and trim from patterned paper! Simple as that!

Hope I've excited you! Make sure to visit my fabulous fellow Pit Crew to see more sneaky peeks of next month's set!


materials:

Paper Crafts magazine Presents: Cool Tools Blog Hop

  
     Hey there everyone! Today's a great day for a blog hop! I am so happy to be joining nine other fabulous ladies as we celebrate Paper Crafts newest special issue Cool Tools for Paper Crafters
     I loved designing for this issue and looking at my tools in different and new ways. Lots of experimentation, lots of botched ideas, but from that you find fresh and creative ways to STRETCH your tools. I think this was one of my favorite calls ever because even though at first, I was like, "uh....what can I do that hasn't been done?" the ideas eventually started flowing and I tried them out!
     In fact, I had my issue of Cool Tools for Paper Crafters in my car and was driving around with some friends. One of my friends whose pretty new to paper-crafting saw it, started looking through it and  was super excited to see all that she could do with tools she didn't even know how to use!
     So, I took a look at my shape punches and thought about banners, or creating a background, maybe adding embellies or something simple like layering them, and here's what I came up with-pathchwork stars. Danielle Flanders offers another fun way to make these as well, so check out her ideas here! They're fabulous!


I wanted to create patchwork stars using my star punch 

then add a cute little scalloped border using my starburst circle punch

So, here's the technique for a patchwork star
1. Punch your stars

 2. Trim stars into smaller sections

3. Take pieces and adhere together.

Super easy peasy! Just the way I like.

Leave a comment before Sunday, January 15th at midnight telling me what your favorite tool is and why you love it, and I will pick a winner to take home their own copy of Cool Tools for Paper Crafters.  Make sure to also visit the other wonderful designers while your hopping and leave a comment on their blogs for extra chances to win a copy of this AMAZING issue!
Emily Branch <--that's me!

And, don't forget to stop by Paper Crafts Connection and leave a comment there! They're giving away an amazing prize package of tools that you can play with!


materials:


Epiphany Crafts + Organizing Your Scraps

  Hey there friends! With the start of a new year comes new ideas for how to organize your craft room. This week the design team will be sharing with you how to use your Epiphany Crafts tool to organize your supplies, your room and your projects. Today I'll share a container that holds your scraps with a tie-around closure utilizing the Button Studio 14 tool.

The container is designed from scraps of papers and vellum

To make the tie-around closure:
1. Make button using Button Studio 14 tool
2. Adhere foam tape to back of button
3. Adhere button with foam tape to container.
4. Repeat with other button
5. Tie twine around one end into a knot, and 
then wrap around button on other side.

That's it for me too! Keep visiting the blog for more 
organizational ideas.

materials

Avocado Arts + Sweet Treats

    Hello everyone!! Today marks my very first post with the Avocado Arts, a clear stamp company that makes INCREDIBLY wonderful, high-quality stamps that produce beautiful images EVERY time. When stamping, images are clear, bold and don't fade out. They work beautifully with inks--I really love stamping with Avocado Arts stamps.
   They offer great incentives to design with their stamps. For example if your project is published using their stamps, and Avocado Arts is mentioned in the supply list, you'll receive your choice of a free set of stamps!!
   Today I am sharing a card featuring the January release of Sweet Treats Sweetie. I loved the adorable little glass jar and the hearts and conversation heart sentiments. So, I stamped the sentiments on the hearts, trimmed the hearts and adhered them in a jar that I had stamped on the vellum. This set has so many fun little images!


Make sure to check out the following Pit Crew blogs for more inspiration!

materials


SEI Promise Me + Paper Crafters Corner Poll

    
    Stop by Paper Crafters Corner to vote for your favorite Valentine's Day line, Promise Me from SEI. The pictures don't do this collection justice. It's so beautiful. Take a look, and vote for it at Paper Crafters Corner


Promise Me Sheer die-cut accents


Adoration Pearl foil paper

Happiness Pearl foil paper


Stop by all month to see some projects using this beautiful line!

SEI + Java Jackets!

     Hey everyone! I hope that you all had a wonderful New Years and that you made some fun new crafty goals for 2012, like being inspired by SEI paper and products, trying new techniques featured on SEI Lifestyle, and continue being the crafty diva that you already are!
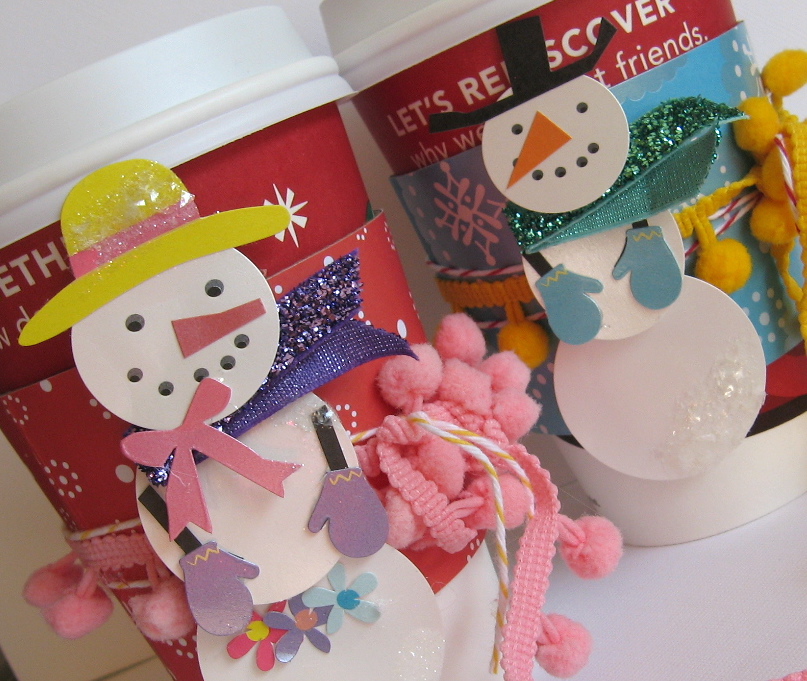
  Today I'm going to share a fun winter project you can make that's easy, affordable and fun! The only non-scrapbooking product you'll need is a java jacket to be used as a template. Here are the simple and fun steps to design a java jacket.
1. Gently un-adhere a java jacket by 
pulling apart at the seam.
2. Trace the shape onto patterned paper and trim.
3. Adhere patterned paper to java jacket, embellish 
adhere edges together with a strong adhesive.

  Add small areas of glitter to create a "snowy" effect! Adding glitter in small areas making sure that you don't over-power other elements of your project!

To make sure the trimmed paper fits the sleeve perfectly, score the folds of the original sleeve onto the patterned paper, then adhere to the cardboard java jacket.

materials


Pin It button on image hover