Image Map

Mood Board Challenge with WPlus9

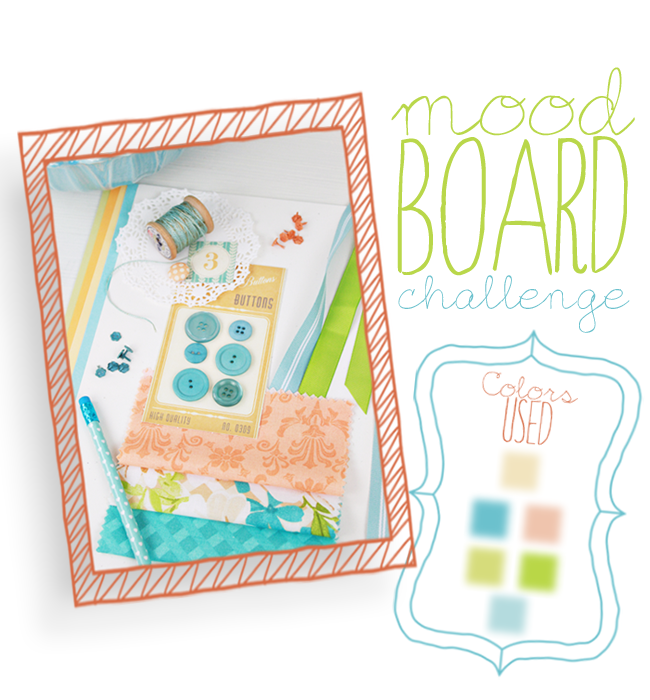
Stamping with new stamps is like showcasing a new outfit, you love to show it off! My WPlus9 order came this week, and I couldn't wait to start playing with one of the sets, Folk Art Florals. The best part of getting my order was that I had time to play along in WPlus9's Mood Board Monday challenge. For today's challenge, I pulled a few colors from the board, and created contrast by using intense hues of the peaches and turquoise to make the elements of my card pop.
I love to layer different elements to give some dimension and texture to the design of my cards. Don't be afraid to try it yourself. I mixed stamps, washi tape and added a cabochon flower and sequins, all in the coordinating colors of the mood board.
Since, my the melon color that I wanted to use for this card hasn't arrived yet, I stamped the pink flowers with Angel Pink and Lemon Tart, I inked them with one color first, and then rolled the tips of the stamp on another ink pad. To prevent crossing contamination of ink colors, make sure that you ink the lightest color first.

I had so much playing along, even though I find color challenges the hardest for me. It's hard for me to stay within the color board!

Designer Day: Kelley Eubanks

You asked, I listened. You wanted me to feature some guest designers here, so I went in search of blogs where designers with an array of styles and free time would want to share their tips, solutions, style and crafty goodness with you. Once a month, I'll showcase a project from a lovely designer on the blog. Make sure to visit their blogs, and leave some love for them!

Today's designer is a a dear friend, and wonderful desginer, Kelley Eubanks. Kelley's best known for her clean and simple style, which can be found in various publications, and at her blog, My Front Porch. Clean and Simple is a style I try hard to emulate, but I seem to struggle with a tendency to layer a bit too much. So, I will take notes from Kelley and the fantastic project she made exclusively for us.

inspiration source

materials: Background Basics: Super Stripes | Document Wooden Alphabet Stamps

Aren't those eggs so cool? I am very much into black and white right now! I love stripes and numbers... which is why I chose to incorporate those into my card. I will be 36 years old in a couple of weeks so, I decided to make myself a birthday card to share with you. A card-making girl has got to make herself a birthday card, right? 

My card making style has always been clean and simple. This past year my style has become more minimalist than just clean and simple and it is reflected in all areas of my life... not just in my crafting! I will be forever grateful for my time spent in the crafting and blogging world for many reasons. It helped me realize and embrace that being crafty is a part of who I am. It has also helped me to understand what my style is and embrace that as well. 

The card I shared today could be seen as plain or blah or whatever. To me.... it is a design that catches my eye... and that is what is most important. It isn't what other people think about your work that matters. It is important for you (and me) to know what we are drawn to and to enjoy creating. In my experience... when I try to make anything other than what I love... it never works out and I don't enjoy the process!

My card took a total of 5 minutes...at most... to make! It isn't fancy... it isn't anything but a black and white minimalist design... and I love it! So my lesson for the day... be who you are and design what you love... and be proud of it! :)

Kelley Eubanks. is a stay-at-home mom and wife. She loves crafting, upgrading her home, and redecorating.  She describes her style as evolving into a minimalist approach; slowly but surely. She  enjoys blogging at My Front Porch. Her main passions in life include her boys and most of all, Jesus.

Thanks so much Kelley for sharing your fabulous work with us. I do have to agree with her, sometimes when you're busy making birthday cards for everyone else in your life, you need to make sure one is made for you!


Pretty and Sweet Cards

It's confession time! Yes, I need to be honest with you. Are you ready for it?Well, I have always had a love affair with paper, but now I think I am falling in love with stamping!! I know, right!? All these years paper and I have been like peanut butter and jelly, but with Sweet Stamp Shop's newest release, I think I may be crushing on stamping more than paper!
Chalkboard Sign is one of the new releases at this month at Sweet Stamp Shop. While it has some fabulous images to create the newest trendy Chalkboard designs, you can use it in other pretty ways too! I took the banner stamp, and used it with the flowers, leaves and decorative border from Sweet Victoria to create a soft and pretty thank you card.  

Making straight lines can be tricky when you're stamping at a diagonal, so I found that layering strips of washi tape as a guide to make a straight edge is the perfect solution for creating perfectly even diagonal stamps. After you have stamped your image you can gently erase the lines. 
Here's another way to use Chalkboard Sign to create a non-chalkboard card. I heat embossed the sentiment banner in white, and then used the resist-emboss technique to create a pretty gradient. I added some vellum flower stickers from Amy Tangerine's Yes, Please collection to the corners to draw your eye towards the sentiment. And, of course--sequins.
For this next card I was inspired by the increasingly popular trend that's emerging in the paper crafting world, which first started in photography; bokeh. Bokeh is a technique where you can created a distorted, soft blurred look in your photos. It's gaining popularity as it makes it's way into more smartphone photo apps where you can choose it as a filter, or you find in scrapbooking paper lines. I was inspired by the colors and hearts in the photo above to make the card below.
This card was so easy to make, and I love how it turned out. I inked the edges of white cardstock to create a blurry soft background. I stamped the sentiment with the heart from the Kiss Me set and created the bokeh hearts by stamping the same heart multiple times after inking the stamp only once. Be careful though, a little bit of hearts are just right!
And, finally here's a fun and trendy card full of font happiness. I stamped "I find you" with Alpha Tabs, and then created a fun collage of words using Today Was. I added some paper from Studio Calico's newest line, Sundrifter.
I wanted to stamp the Alpha Tabs in a straight line, so I turned to my trusted washi tape, and adhered it to the card. I used the tape as a guide to help me stamp the individual tabs. Washi tape is a glorious invention. Not only is it pretty, it's so totally useful. No more erasing pencil lines, or ripping off paper bits like painter's tape can so often do.

What do you think? What's your favorite Sweet Stamp Shop release this month? 

Make sure to stop by tomorrow for my first monthly guest designer post from Kelley Eubanks! You're going to love her clean and simple style!

Transparent Votive Wraps

Okay, I am not someone who should ever be allowed near fires, candles or flames of any sort. Not only am I horrible at lighting birthday cake candles, I'm super clumsy. So, the fear of dropping said candle on the floor, and burning down the house plagues my mind at events where birthday cakes are present. Luckily, our fireplace operates with the flick of a switch, and all the candles in the house are decorative, or lit by my husband (who makes sure I'm never operating a lighter). 

But, today's project doesn't require anything that would cause the kind of damage that I'd have to report to my insurance company. Today's project features the lively and colorful newest spring collection from SEI, Diane. This collection has it all--a lovely watercolor look, bright pastel colors, springtime flowers, and best of all, it's perfectly suited for transparent votive wraps.
The transparent votive wraps are made from patterned paper found in the Diane assortment and 6" x 6" paper pad. I think these are going to look so beautiful when they're lit and the soft flame of the candle is glowing through the overlay.

Try using SEI's foil patterned paper when making the votive wraps. I noticed that the foiled paper took the best to this technique, shining through in such a perfect manner. New to this technique? Visit my post here for a tutorial.
Don't forget to package up your beautiful votives in a wrapped gift box for the recipient. The box wrap features Diane's lovely die cut accent tags mixed with the soft and glittery cardstock stickers. I loved how the bright lavender, chartreuse and orange work so perfectly with the pinks found in the collection!

Sweet and Simple: Easter Cards

So, I have a confession. Are you ready? I feel like a hypocrite. I am always sharing ideas for projects, gifts and cards that you can make to give, but I never share what I make for my friends and family. Luckily, my most favorite customer, my mom, commissioned me to make some Easter cards for my family. What's great about making cards for people you know, is that you know what they like, and can incorporate their interests into the cards.

Even more exciting, is the fact that I made four cards and an Easter banner for my mom in, get this--five hours! Yes, that is a new record for me. I craft extremely slowly. Partially, because I am a perfectionist, but also because I have to clean every stamp, package every sticker back up and put it away and organize my supplies. I know, I have issues. 
Sometimes, you want a card that doesn't have bunnies and eggs on it. This card totally fits the bill. I love pulling bits and pieces together I stamped an embroidery hoop and layered with die cut flowers. Then, I had some fun mixing up the sentiment with stickers and stamp. My sister is pretty cutting edge and fun, so I think she'll love this card. Hopefully, she's not reading my blog and seeing it here.

I had some fun with non-traditional Easter colors. Blue and orange complement each other so well, and for a quick and simple manly card, you can't go wrong with these bold colors. Don't forget to play up the eggs with some sequin fun! 

My brother is a fan of Peeps. Every year he hits the stores the day after Easter and buys out all their Peeps. I remember the trash being full of the boxes days after Easter! I love this stamp, and I thought the Peep's would look cute with ties and bow ties,  plus a little color dabbed on to their cheeks with a q-tip.

Ever wonder how to pretty up a stamped Easter Egg? Add some fun touches like pretty bows, cabochon flowers and a fun doily die cut. I love the simplicity and elegance of this card. 


My mom (whose my next door neighbor) was so thrilled to pick these cards up a couple nights ago! She loved them, and has always been my biggest fan!! Sweet woman---she makes all our Easter's so special. Even though were grown, married and living on our own, she gives us Easter baskets filled with our favorite candies. So happy she still thinks of us, and the holiday traditions of our childhood. I'm glad to give her something special on Easter, just for her!

Selling My Stamp Stash

Out with the old, and in with the new. Great stamps at great prices. Quick shipping through USPS.
Paypal accepted. 
Sunshine Smiles $5 (SOLD)
My Wish for You $5 (SOLD)
Sew Nice $5 (SOLD)
Perfect Blend $5 (SOLD)
Strike a Pose $5  (SOLD)
Avocado Type $5 (SOLD)
Sew Special $5 (SOLD)
Flutter By $5 (SOLD)
Hello Friend $5 (SOLD)
Portrait $3 (SOLD)
2010 Love Tags $7 (SOLD)
Mod Squad $7 (SOLD)
Guide Lines $5 (SOLD)
Shapes by Design $6 (SOLD)
Wake Up $5 (SOLD)
Get Outta Town $5 (SOLD)
Summer Groves $5 (SOLD)
Across the Miles $5 (SOLD)
Paper Girl $5 (SOLD)

Are you interested? Email me at queenerh at yahoo dot com or message me via Facebook.
Items are shipped Priority Mail flat rate in either a small box or padded envelope or they'll be shipped first class.
Sorry no orders outside the U.S.

Making Elegant Cards with Patterned Paper Overlays

I love patterned paper. Who doesn't? When I'm in my local scrapbook store (yes, I am blessed with the most amazing store nearby--well, almost nearby....about 15 miles), the one product that I buy the most of is patterned paper. Patterned paper is so versatile-- you can cover cards with it, trim pennants, even make embellishments. I could go on and on, but you get the point-paper is the one essential I always but the most of. The best patterned paper combines gorgeous details, bold motifs and prints, textures and an elegant color scheme. that's not only timeless, but trendy. SEI's newest release nails all these points (again) with their newest release, Mia Bella.

I love to play with paper and experiment with it. One of my favorite techniques for patterned paper is making it transparent and using it as an overlay.
To make your transparent banner overlays really stand out, use patterned paper that contrasts in both design and color, while layering darker overlays on lighter backgrounds and vice versa.
You can make your overlays into strips, like what I used for the banners and "faux" tape on the cards, or you can create a block of patterned paper overlay by placing strips of tape over a block of patterned paper.

Overlays are so easy to make, you're going to want to do it all the time! But, keep your electronics far away, the process can get a little wet. 
materials: Paper from the Mia Bella collection | Water | Clear tape (not glossy)

|1|  Trim strips of patterned paper. If you plan to only make strips of overlays, measure the width of the tape, and trim your patterned paper accordingly.

|2|  Cover the patterned paper with tape, smoothing out any wrinkles. Make sure there are no bubbles. Trim the excess tape, and any areas of patterned paper not covered with tape.

|3|  Dip the patterned paper into water, and let soak for about five seconds.

|4|  Turn patterned paper over,  and use your "finger" to rub off the paper, leaving only one side of the patterned paper.

Note: Let the overlay dry before adhering. Affix to project with clear, double-sided tape.

Super easy eh? I only say to keep the water away because I learned my lesson well, when my husband had to replace my last Mac after I spilled coffee all over it. Apparently, turning the computer over to "drain" the coffee out didn't help. No liquids (mist or water) near electronics!

Stamping Meets Your Life

I love it when real life meets card-making. It doesn't happen often, but when it does--man, is it great! In real life, you're busy managing schedules every day with your family, your friends, your spouse--even your crafting. Your desk gets messy, your purse overflows with bills, make up, and the odds and ends of life. Sure, it's a little hectic, but would you really want it any other way?

Well, I happen to like the everyday. I like calendars, penciling in dates, heck- I even like balancing my   checkbook. Sweet Stamp Shop's newest releases celebrate the little things we use every day that make our lives work, and work perfectly--well, almost.

Post it's are one thing that I use every day. I use them at school, I use them when I craft, and I always find them tucked away in my pockets. To celebrate my little obssesion with post it's I stamped a little collage of sentiments from the new set, Today Was on a post it and affixed it to the panel stamp image which is totally customizable--bonus! I love sets where you can create your own sentiments. Plsu, I can always switch out the post it on this card to make a fun new sentiment to give my hubby!

Adding a photo is a fun touch for any card. My husband travels a lot, and I always tuck away handmade cards in his clothes when I pack him for trips. Sometimes, I add little photos. This would make a perfect card for my husband because it has a photo, and I could switch out the sentiment with a new post it. Plus, I think a photo softens up a card that uses a lot of text, giving your eye a place to rest.

Who says you introduce can't introduce cards to social media? Social Media meet my card. My card meet your biggest fan-social media. I mixed Sweet Stamp Shop's new release Alpha Bits with a value scale from last month's Color Wheel set, and added some social media flare to the design.

Sure, I could have added the sentiments from Today Was, to the card, but I think the value scale anchors the design well, allowing the eye a place to rest.

My husband is just getting into social media, and it's our anniversary next month, so shhh-don't tell him, I am going to give him this card for our anniversary!

The Alpha Bits set is great to because it include popular sentiments, the individual alpha letters and social media icons all  in one set. If I was a Project Life person the Alpha Bits and Today Was sets would work perfectly. You could have so much fun customizing your album pages with different titles in cute fonts. Hmmm....maybe I should try getting into Project Life just to use this set more!! Ehh....hahha, maybe not!

So, what do you think? How would you use the Alpha Bits and Today Was sets? 

Doodling with Stamps!

I used to love to doodle and sketch in my notebook, although it was usually hearts around the name of my crush. "Mrs. Emily So-and-So", you know how it is. Math always went by quicker with a notebook full of flowers, shooting stars and hearts. 

Sweet Stamp Shop's newest releases, Kiss Me and Chalkboard Sign are the grown up version of doodling in my math notebook, and so much prettier too!
Every part of the Chalkboard Sign is perfect in creating a doodled card look! I especially love the sentiment stamp. It has this great sketchy look to it,  and works great when masked. Since bright neon color blocks are in, I thought it would look cool to stamp "way" as a gradient. In fact, it's super easy to do!
Washi tape

|1|  Gather your materials, including the Chalkboard sign set.

|2|  Mask the part of the sentiment that you don't want to include with washi tape.

|3|  Ink stamp with  Dandelion Ink pad.

|4|  Ink middle of stamp with Tangelo Ink pad.

|5|  Ink the last remaining part of stamp with Bubblegum Ink pad.

|6|  Remove tape and stamp card.
Sweet Stamp Shop's  other release, Kiss Me is just as perfect in creating a fun doodled effect to your card. Try stamping the trendy love heart image to create a layered look--it looks so cute.
That little kissing arrow sentiment is so stinkin cute! Totally doodle-icious! Seriously, these sets are so perfect for achieving the fun notebook doodle look. 

Tell me, did you ever doodle in your notebook's during school? What did you draw?

 
Pin It button on image hover